3D Starfield
6502 Assembler: Programming a 3D-Starfield Simulation
Another historical example for a 3D-starfield – which should be widely known – is Windows 3.11, released in 1992, which was probably the first operating system to ship with a selection of screensavers. One of these screensavers was the 3D-Starfield Simulation.
In this article I want to give an insight into the development of a 3D-HIRES-starfield on the Apple ][ computer that can be used as an effect for games, demos or logos or just being watched and played with for fun. A video of the 3D-starfield for the Apple ][ in action is shown below.
Parts of the code are also a spin-off from the 3D-Demo since calculating the 3D star position needs some 3D-calculations as I will explain later. Furthermore, in order to add some randomness to the star field generation, the code needs some sort of pseudo random number generation that yields a sequence of evenly distributed random numbers that don’t show up in repeating patterns that are recognized easily.
At the end of the article I will do a quick side trip into 6502-profiling by giving a short introduction to the champ 6502/65C02-profiler project and show some profiler output when running the 3D-starfield.
Getting the 3D-Starfield
The demo is free of charge. However, we charge for sending you a physical copy of the demo on floppy disk.
Physical Copy
Interested in a physical copy of the demo on 5.25" floppy disk? Drop us an email in order to receive information about availability and pricing.
Free DSK-Images
Visit our shop to receive your free DSK-images for using the demo in your favourite emulator or to use it with your floppy emu! The 3D-Starfield is free for download there:
Basic Considerations
The starfield consists out of a set of up to 60 single stars (starting from a minimum of 8 stars). Each star is defined via its X-, Y- and Z-coordinate in 3D-space and its velocity in negative Z-direction.
The viewport of the user is setup in a way that the screen is orthogonal to the Z-axis and intersects the Z-axis at 0 with the user viewing in positive Z-direction. The screen center resembles the value 0 for the X- and Y-coordinate accordingly.
In order to make a star approach the viewport, the current Z-value of a star´s position is decreased according to the individual Z-velocity of the star for each animation frame while the initial X- and Y-positions remain unchanged as long as the star travels along its trajectory. Based on the X,- Y- and Z-coordinates the HIRES plot coordinates are calculated which usually change in every animation frame.
Each star is animated along its trajectory until the star´s Z-value reaches zero or the star´s X- and/or Y- plot coordinate lie outside the valid viewport, i.e. the calculated X- and/or Y-screen coordinates lie out side the allowed 0 to 279 for X and 0 to 191 for Y according to the Apple ][´s HIRES-screen limitations.
When the animation of a star along its trajectory is finished its X- and Y-coordinates are changed to new values that are calculated using a pseudo random number generator (see below) in order to get a more random aspect of the star field by avoiding quickly repeating star patterns. Also the Z-coordinate is reset to a maximum value that is user controllable in order to initialize the trajectory of the new star. This allows for increasing or decreasing the travel distance of a star along its trajectory in order to change the visual effect.
Star animation speed is slowed down using the Apple ROM monitor WAIT-routine located at $FCA8. Depending on the value of the accumulator the WAIT-routine spends a non-linear amount of cycles. The formula for calculating the value WAITCNT that is used as input for the WAIT-routine is based on the selected number of animated stars as follows:
WAITCNT = (61- NUMSTARS)/2
This balancing of the WAIT-routine results in a more steadily animation speed of the starfield especially when reducing the number of animated stars. However, it must be taken into account that the number of cycles that are spent by the WAIT-routine is non-linear regarding to its input value WAITCNT! The formula which gives the exact number of cycles spent by the WAIT-routine is given by:
CYCLES = (26 + 27*WAITCNT + 5 * WAITCNT^2)/2
Hence the simple adaption of the WAITCNT-value to the number of stars is not optimal but the animation result looks acceptable.
Controlling the 3D-Starfield
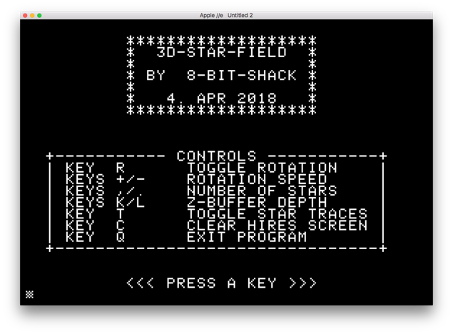
The 3D-Starfield can be controlled via the keyboard. The following screenshot shows the startup screen when booting the DSK-image with the possible keyboard commands that will be described in more detail in the following paragraphs:
- Number of stars: via the keys “,” and “.” the number of stars can be changed from 8 to 60.
- Z-buffer depth: determines the number of animation steps in the Z-direction of a star (length of the trajectory) and can be changed from 10 to 64 via the keys “K” and “L”. The higher this value is chosen the longer the trajectory of each star gets.
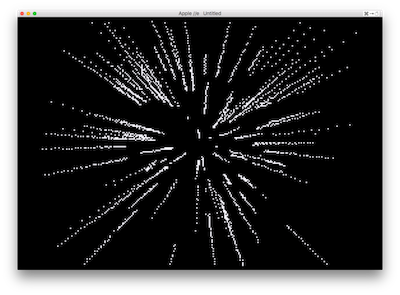
- Toggle star traces: via the key “T” plotting of the star traces can be switched on. In this mode undrawing of the stars is disabled which makes the trajectory of each star along the Z-axis visible.
- Clear HIRES screen via the key “C” the HIRES screen can be cleared. This becomes handy when the trace mode was switched on.
- Toggle rotation: key “R” toggles the rotation mode ON/OFF. This mode shows a spinning starfield
- Rotation speed: when the rotation mode is active the rotation speed can be changed by the keys “+” and “-“.
- Exit program: is done via the key “Q”.
Technical Background: 6502 Assembler Tidbits
Let’s dive a bit deeper into the source code in the following paragraphs and shed some light on some important details of the 3D-starfield animation.
Star Data Management
Managing the data of the stars is rather straightforwardly done using a data table holding the X-, Y- and current Z-coordinate of each star as well as the plot position of the star on the HIRES-screen.
While the X- and Y-coordinate of a star remain unchanged during the animation along its trajectory the Z-coordinate is decreased to animate the star towards the viewport. When a star reaches the end of its trajectory the X- and Y-coordinates are changed to create a new star position using the pseudo random number generator described below.
##Drawing and Erasing of a Star Drawing and erasing is simply done by setting and clearing a pixel on the HIRES page. However, due to the unusual layout of the Apple ][ HIRES memory, this is not an easy task to do.
As you might recall each HIRES line with 280 pixels is stored in 40 consecutive bytes of memory. Each byte represents 7 pixels on the screen in x-direction (in reverse order to be more precise and different for even versus odd “columns” when considering colored pixels – but I do not want to get more into these details here!). The 8th bit of each byte encodes the color palette.
To make it even more complicated consecutive HIRES lines in y-direction are not stored sequentially in memory so you need to implement a function that gives you the base address of the first byte of the desired HIRES line number. After determining the base address you need to figure out in which of the 40 bytes the pixel information has to be stored. Since every byte holds 7 pixels you need to divide the x-position of the pixel by 7 in order to get the position of the corresponding byte in the row of 40 bytes and use the remainder of the division for determining the pixel position inside the byte. A fast way to perform these tasks is using lookup tables and a pixel mask.
The pixel masks for setting and clearing a pixel are given in the following example:
1*
2* pixel masks for setting and clearing a pixel in a HIRES-byte
3*
4DRWMASK   	DFB 	$01,$02,$04,$08,$10,$20,$40
5CLRMASK		DFB	$7E,$7D,$7B,$77,$6F,$5F,$3F
6*
Setting a pixel is done using an OR-operation of the corresponding screen byte with the appropriate pixel mask (DRWMASK). This preserves the current screen content and sets an additional pixel. If we want to clear a pixel we need to perform an AND-operation and use a different pixel mask (CLRMASK) in such a way that other pixels than the one we want to clear remain unaffected.
For example if we want to set the third pixel we would need to use $04 as DRWMASK which equals %0000 0100 in binary. Performing an ORA %0000 0100 will set the third pixel while preserving the current content of the screen byte.
Clearing the third pixel will be done by using an AND %0111 1011 (= $7B). Please note that the HI-bit for switching the color palette is never set when setting and clearing pixels.
A more detailed description of setting and clearing HIRES pixels can be found in my article about the 3D-Demo in the fall 2017 issue of Call-A.P.P.L.E.
Star Projection
In order to calculate the HIRES screen positions of each star a simple projection has to be calculated. The screen coordinates are basically calculated as follows:
XPLOT = (X / Z) + 139 YPLOT = (Y / Z) + 95
Since X and Y are signed numbers ranging from -127 to +127 we need to translate the center of the starfield to the HIRES screen center by adding appropriate constant values (half of the width and height of the HIRES screen).
This projection method is known as simple perspective projection. As can be seen from the formulas the fixed X and Y-values get divided by the distance Z of a star from the viewport – this is most of the magic of the 3D-starfield effect!
Hence: the greater Z the farer the star from the viewer and the closer the star is plotted to the screen center. When the star approaches the viewer while Z is decreasing the quotients X/Z and Y/Z increase and lead to a movement of the star from the center of the screen to the outer boundaries resulting in the effect of flying through a starfield. This can be easily demonstrated by activating the star trace mode (see above):
For calculating the projection a division by Z is necessary. In order to speed this operation up as fast as possible the division was converted to a multiplication by 1/Z (e.g. X * 1/Z) using a fast lookup table method that needs only 55 CPU cycles per multiplication. More information about this fast multiplication method can be found in my article about the 3D-Demo in the fall 2017 issue of Call-A.P.P.L.E.
Star Velocities
The standard star velocity is decreasing the Z-value by one per animation cycle (frame). However, in order to produce a parallax-like effect, the speed of some stars is doubled or even tripled. This results in some objects moving rather fast towards the viewport, which improves the impression of moving through the starfield.
Take a closer look on the following code snippet showing parts of the main animation loop (the X-register holds the value of the current star that is animated):
 1 	LDX NUMSTARS			; number of stars
 2mLOOP 	DEC STAR_Z,X			; decrease Z-distance
 3 	BEQ _reset			; reset Z-distance
 4 	TXA
 5	AND #%00000011			; every fourth star gets
 6	BNE _noDEC			; a double decrease
 7	DEC STAR_Z,X
 8	BEQ _reset
 9_noDEC	LDA WAITCNT			; get WAIT duration
10	BEQ _action			; no waiting if WAITCNT = 0!
11	JSR WAIT			; make it a bit slower
12	BRA _action			; move a star
13_cont	DEX				; next star
14	BPL mLOOP 			; not done with this frame
15	JMP READKBD			; frame finished
First the number of stars to animate are loaded into the X-register. Then the Z-value of each star is decreased. If the Z-value equals zero certain reset actions are taken: The Z-value is reset to a user controllable maximum value and the X- and Y-coordinate of the star are set to new values using the pseudo random number generator described further down in this article.
The decision to double the star’s Z-velocity is done via the AND #%00000011 statement where the current star number is checked using an AND-operation if the two lowest bits of the star number are both zero. If this is the case the BNE _noDEC will not branch since the result of the AND-operation is zero and thus the star’s Z-value will be decreased a second time doubling the speed of this star. This AND-condition will result in a zero for every fourth star yielding a ratio of three to one regarding slow versus fast stars.
The operation LDA WAITCNT loads the precalculated input value for the WAIT-routine (see above). If it is set to zero the WAIT-routine will not be called. The label _action points to the part of the code where the star’s position on the HIRES-screen is updated. The algorithm returns to the label _cont after animating the star where the value of the X-register is decreased. If X is negative all stars have been updated and drawn and the algorithm jumps back to the part of the code where the keyboard with possible user input is evaluated.
Another design consideration regarding the graphical representation of the starfield would be not to animate all stars towards the viewer but to have some stars that do not move, thus simulating fixed objects that are rather far away from the viewer. These very distant objects could also benefit from some flickering in order to improve the visual effect – there remains still a lot room for improvement!
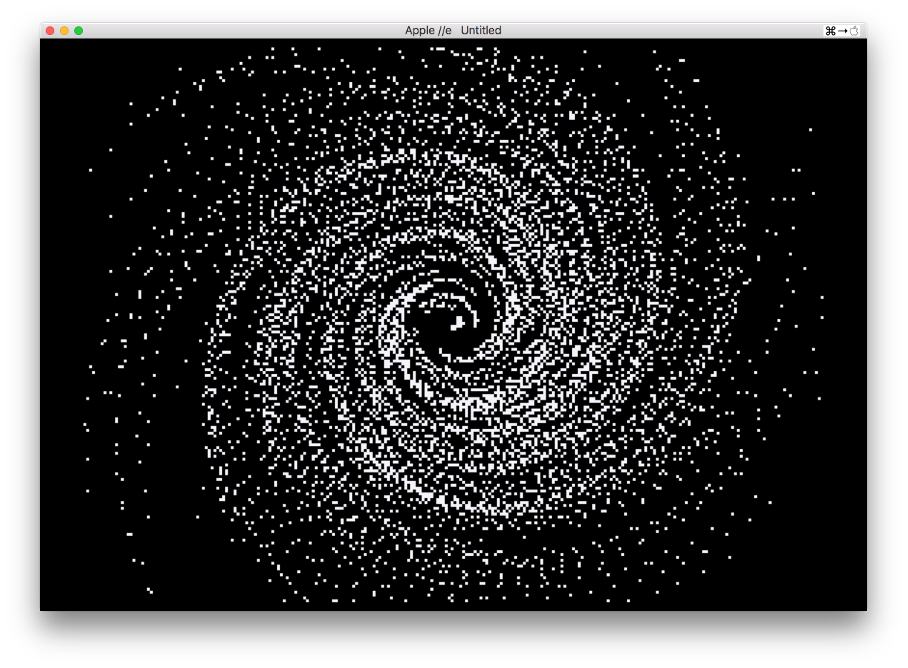
Rotation Mode
By activating the rotation mode the starfield rotates around the Z-axis while the stars keep being animated along their trajectory. This results in spiral trajectories of the stars that can be experienced best when the star trace mode is switched on:
The rotated coordinates are calculated by using the X- and Y-screen coordinates of the stars that have been determined by calculating the projection before:
XROT = XPLOT * SIN (phi) + YPLOT * COS (phi) YROT = XPLOT * COS (phi) – YPLOT * SIN (phi)
For fast calculus results the sine and cosine values are retrieved from a 256 bytes lookup-table. Multiplications are also done using lookup tables with a data size of 2 kB (eight memory pages) for fast math-operations.
Pseudo Random Number Generator (PRNG)
In order to generate a more accidental pattern of the star distribution a possibility to generate “random” numbers for the star’s X- and Y-coordinates is necessary. This is done here using a method, which is called linear feedback shift register.
The shift register is defined as a register whose input is defined as a linear function of its previous state (output). The most commonly used linear feedback function is exclusive-or (EOR in 6502-assembler) in combination with a shift operation.
The initial value of the shift register is called seed. Since the operation of the register is deterministic, the stream of values produced by the register is completely determined by its previous state. Because the register has a finite number of possible states it enters a repeating cycle and produces repeating patterns of numbers. However, if the linear feedback function is chosen wisely, the shift register can produce a sequence that appears to be random and has a very long cycle length until the number sequence repeats itself.
One of the simplest (and fastest) formulations of an 8-bit pseudo random number generator shall be demonstrated with the following piece of source code:
1****************************************
2* 8-bit pseudo random number generator *
3****************************************
4*
5		LDA	SEED		; load old value
6		ASL
7		BCC	noEOR
8		EOR	#$1D
9noEOR		STA	SEED		; save new value
In this example the variable SEED holds the pseudo random number. In order to obtain the next random number the old value is shifted first. If the high-bit was set, an exclusive-or with a distinct value (here $1D) in order to change some of the lower bits is done.
This algorithm will cycle through the values $01 to $FF exactly once in a “random” order before the same sequence is repeated again.
A problem emerges when the input value of SEED reaches zero: the output value of SEED would always stay zero then! Since the high-bit is always clear, the EOR will never be applied. If we would change the BCC to a BCS, i.e. the EOR will be performed when the high-bit is set, the random pattern is lost and not all numbers in the range from $01 to $FF will be reached no matter which distinct value will be used for the EOR-operation!
A second problem is that this little routine will never output a $00 as random value so we need to introduce two special cases: firstly deal with $00 as a SEED-input value and prevent the algorithm from getting stuck and secondly change the routine in such a way that $00 is a valid output value. If we introduce two additional BEQ statements we can accomplish these two goals:
 1****************************************
 2* 8-bit pseudo random number generator *
 3****************************************
 4*
 5		LDA	SEED		; load old value
 6		BEQ	doEOR		; if SEED = $00
 7		ASL
 8		BEQ	noEOR		; output $00
 9		BCC	noEOR
10doEOR		EOR	#$1D
11noEOR		STA	SEED		; save new value
The first BEQ intercepts a SEED-input value of $00 and forces an EOR resulting in a new SEED-value of $1D. The second BEQ intercepts an initial SEED-value of $80 (this value will be zeroed by the ASL-operation) and returns a $00 instead so we solved both problems: the algorithm accepts every input value from $00 to $FF and produces an output range also from $00 to $FF.
There is, however, a small drawback: due to the fact that an $80 will always result in a $00 and a $00 will result in a $1D we always have a fixed sequence from $80 to $00 and then to whatever distinct EOR-value we have initially chosen.
Regarding the EOR-value of $1D: it is a good idea to experiment with different distinct values or to change the value dynamically during runtime in order to get more variation of the generated random number sequence.
Profiling the Source: Animation Speed
For each graphical animation the frame rate is crucial. Hence a method for determining the exact cycle count for each frame is needed. Since the Apple has no built-in feature to provide the needed CPU-cycles for an algorithm an additional tool is necessary.
The tool used here is Dr. N Harold Cham’s champ-65C02-profiler which was developed by Michael Specht (a link to his project page on GitHub is given here).
Champ is a profiler for the 6502/65C02 written in C that can be compiled on any platform that supports gcc and ruby. Furthermore the Merlin32-assembler from BrutalDeluxe is needed which can be found here.
Champ fully emulates a 65C02 processor with 64k of RAM and is able to generate HIRES-screen runtime output. However, champ is not an emulator and hence cannot simulate any specific hardware, e.g. disk-I/O or keyboard input. Nevertheless, champ is able to load, compile and run Merlin32-assembler code while keeping track of an exact cycle count (even when single operations cross memory page boundaries!) for each animation as well as offering more debugging features like defining watches in order to monitor certain variables during runtime.
The HIRES-screen output can be visualized as an animated GIF with exact frame timing, i.e. as it would look on real hardware. Furthermore champ is able to provide a call graph if the GraphViz-package is available on the system. The call graph shows a detailed analysis of the program structure: which subroutine is called how many times and how many cycles are needed for each individual subroutine call? The call graph is a powerful tool for analyzing the inner structure of an algorithm and for identifying potential for code optimization.
In order to use champ the program under test needs to run automatically, hence all necessary settings have to be done in the code in a setup routine since no user input is possible during the simulation run, as well as user input cannot yet be simulated during runtime. Champ generates an HTML-report presenting all the acquired profiling data that can be viewed in any browser.
The following picture shows a champ profiler report of a 3D-starfield profiler run with activated rotation mode and 40 stars:
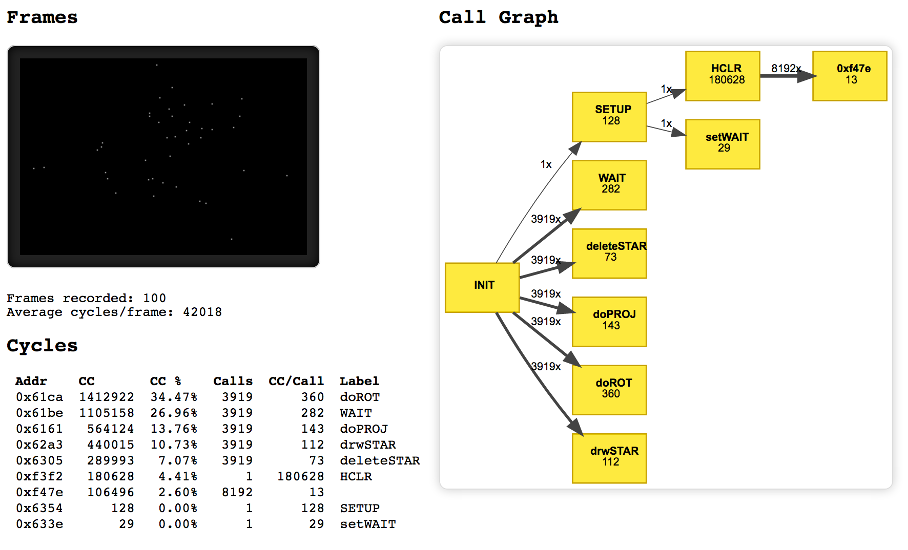
The upper left part of the report shows the HIRES screen output as an animated GIF with accurate timing. Below the GIF-image the number of animation frames included in the profiler run as well as the average cycle count per frame is given. Here a total of 42018 cycles per frame is needed resulting in a frame rate of approximately 24 fps.
Furthermore a list of function calls and needed cycles is given, as well as information how many cycles in total a function consumes. This helps identifying the most cycle expensive subroutines in the code.
As can be seen from the call graph the SETUP subroutine is called only once and does a HIRES screen clear (HCLR) and sets the duration of the WAIT-intervall.
The subroutine for calculating the rotated X- and Y-screen coordinates (doROT) needs 360 cycles per call and is the most time consuming subroutine. In order to slow down the animation the Apple monitor’s own WAIT-routine is called after each star is plotted (see above) which needs approximately 27% of all algorithm cycles.
The implementation for drawing (drwSTAR) and erasing (deleteSTAR) a star is rather fast with only 112 cycles and 73 cycles per star respectively. The projection of a star (doPROJ) from its 3D-coordinates to 2D-screen coordinates needs only 143 cyles per star.
The right side of the report shows the call graph of the algorithm generated with the GraphViz-package. This gives a good insight in the inner dependencies of the algorithm. The call graph shows the number of subroutine calls and the needed cycles for each subroutine per call. To be more precise: the given cycle count is an averaged value over all subroutine calls during the profiler run.
The INIT-routine on the left side is the master module, which does the overall algorithm management by calling all necessary subroutines. Here, in order to display 100 animation frames, 3919 stars needed to be drawn and erased.
If you wonder why 100 frames with a maximum of 40 stars do only result in 3919 subroutine calls (and not 4000) then you should ponder about the suppression of the stars that lie outside of the valid viewport (valid HIRES-screen coordinates) when they are approaching and are thus being suppressed (neither drawn nor erased).
Code
The source code can be found on GitHub.